
Do you know how to schedule posts on Instagram? If no is the answer, you are going to learn how to schedule both posts and reels on Instagram. Scheduling your Instagram posts is one of the most effective ways to save time and post consistently.
It also helps free up your social media team to do other important tasks like marketing strategy, creating content, and so on. In this guide, we’ll show you how to schedule posts on Instagram.
Why Should I Schedule Instagram Posts?
Below are some of the reasons why you should schedule your Instagram posts:
- Consistent Presence: Scheduling ensures a consistent presence on your followers’ feeds, helping you maintain engagement and visibility.
- Optimal Timing: You can choose to post at times when your audience is most active, increasing the likelihood of your posts being seen.
- Time Efficiency: Planning and scheduling in advance saves time, allowing you to focus on other aspects of your business or content creation.
- Global Reach: If your audience spans different time zones, scheduling posts ensures that your content reaches followers around the world at times convenient for them.
- Strategic Posting: You can plan your posts strategically, aligning them with events, promotions, or specific marketing campaigns for better impact.
- Content Cohesion: Scheduling allows you to maintain a cohesive theme or narrative in your posts, contributing to a more organized and aesthetically pleasing profile.
- Automation: Scheduling tools often come with automation features, making it easier to manage multiple platforms and ensuring a steady stream of content without manual intervention.
Overall, scheduling your Instagram posts is a valuable strategy to enhance your social media presence and optimize the impact of your content.
How to Schedule Instagram posts
As mentioned earlier, scheduling posts on Instagram saves time, and it has got to be one of your favorite ways to prepare in advance.
Here are guidelines on how to schedule posts or reels on Instagram.
- Open the Instagram app and click on the plus icon
- Tap on the plus icon, and select post or reel.
- Select a photo or video of your choice.
- Add effects or filters, and caption if you want.
- Tap Next.
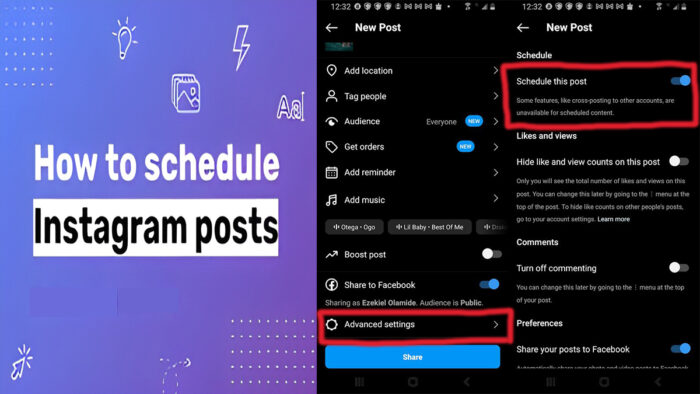
- Select Advanced settings.
- Toggle the Schedule this reel slider to the right and select the date and time you want it to be shared on your timeline.
- Then tap Done.
- Tap the back button at the top left.
- Finally, tap the Schedule button to confirm your settings.
Note: You can schedule a post for up to 75 days away. Also, features like cross-posting to other accounts are unavailable for scheduled content.
How to Manage a Scheduled Instagram Post
After scheduling your post on Instagram, you can manage it by tweaking or modifying it. There are four ways you can manage your scheduled Instagram post: editing it, rescheduling it, sharing it immediately, or deleting it. We’ll show you steps on how to do each of them below.
Editing Your Scheduled Instagram Post
- Login to the Instagram app and tap your profile icon.
- Click on the hamburger icon (≡) at the top right.
- Select Scheduled content from the context menu.
- Click on the three horizontal dots next to the scheduled video.
- Tap Edit Post from the context menu.
- Then make any changes you want, and click the checkmark button at the top right when you’re done.
Rescheduling a Scheduled Instagram Post
- Launch the Instagram app and navigate to your profile.
- Click on the hamburger icon (≡) at the top right and select Scheduled Content from the pop-up menu.
- Tap the three horizontal dots next to the scheduled video.
- Select Reschedule from the context menu.
- Choose the date and time you want from the pop-up window and click Done.
Sharing Your Scheduled Instagram Post
- Go to your Instagram profile.
- Click on the three horizontal lines at the top right.
- Select Scheduled Content.
- Click on the three dots beside the scheduled video.
- Tap Share now from the pop-up menu.
- Immediately, the post will be shared on your profile.
Deleting Your Scheduled Instagram Post
- Go to your Instagram profile.
- Click on the three horizontal lines at the top right.
- Select Scheduled Content.
- Click on the three dots beside the scheduled video.
- Select Delete from the context menu.
- A page will pop up at the center of your screen, asking you to confirm the deletion.
- Tap Delete again, and the post will be deleted immediately.
While post collaboration is unavailable for scheduled content, you can tag people in your scheduled post. With each of the steps above, you can manage your scheduled post on Instagram.
FAQs
Why Can’t I Schedule an Instagram Post?
Instagram accounts are of two types. When you sign up, you get a personal account; you can choose to change it to a professional account (creator or business account). So in order for you to schedule Instagram posts, your account must be a professional account.
Can I Schedule an Instagram Post on PC?
Scheduling posts on Instagram can only be done via the mobile app, as the ”Schedule” feature isn’t available on the web version. The only way to schedule your Instagram posts on your PC is to use Meta Business Suite or third-party apps.
How Far in Advance Can I Schedule an Instagram Post?
You can schedule an Instagram post 75 days in advance, which is the maximum number of days. You can also schedule an Instagram post for less than 75 days if you want to.
How Many Posts Can I Schedule in a Day?
You can schedule 25 posts in a day. That’s the maximum amount of pictures or videos you can post, and you can decide to schedule posts less than 25.


